Overview
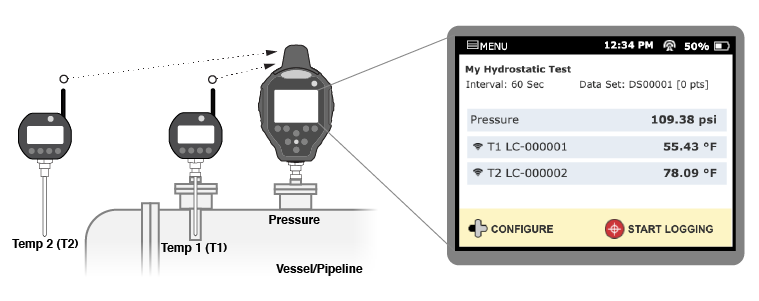
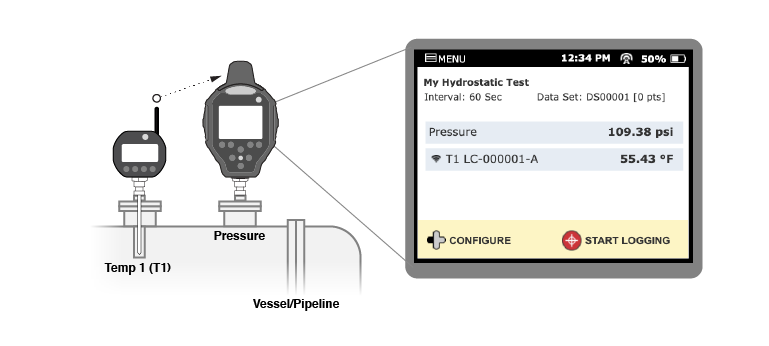
This article will show you how to use a FieldLab and one or two Field Gauge LC20s/Process Meter LC30s to perform a Hydrostatic Test with one pressure reading and up to two separate temperature readings.
- The FieldLab will read pressure.
- The Field Gauge(s)/Process Meter(s) will read temperature(s).
- The Field Gauge(s)/Process Meter(s) will transmit the temperature readings wirelessly to the FieldLab.
- The FieldLab will save all temperature and pressure readings to one data set, which can be downloaded to a PC.
Example setup with two temperature readings:
Example setup with one temperature reading:
Things you will need to perform the test
- A Hydrostatic Test added to the FieldLab. Learn how to Create a new Hydrostatic Test in FieldLab Desktop.
- FieldLab with wireless module running firmware 1.127 or later. Learn how to update firmware on a FieldLab.
- At least one Field Gauge LC20 or Process Meter LC30 with W1 radio and temperature sensor.
Add the Hydrostatic Test to your FieldLab
Learn how:
- Create a new Hydrostatic Test in FieldLab Desktop
- Add Test Modes to a FieldLab
Confirm that the FieldLab and Field Gauge(s)/Process Meter(s) are set to the same wireless radio channel.
Field Gauges/Process Meters and FieldLabs that are equipped with a W1 Radio each have 16 radio channels (11 through 26). All devices must be set to the same channel in order to communicate with each other. The factory default for all Ralston devices is channel 26.
Learn how to:
- Change Wireless Channel on a FieldLab.
- Change Wireless Channel on a Field Gauge/Process Meter.
Connect FieldLab and Field Gauge/Process Meter to the vessel/system being tested.
Connect the FieldLab to the pressure opening, and the Field Gauge(s)/Process Meter(s) to the temperature well and ambient source, if applicable.
Activate the Hydrostatic Test on the FieldLab
1: Select the MENU button to access the Menu.

2: Select the Right Arrow button to view Test Modes.
3: Select the Down Arrow button to scroll to the Hydrostatic Test you wish to use.

4: Select the center Zoom button to ACTIVATE the Hydrostatic Test.
Once the Hydrostatic Test is activated, you will see a screen instructing you to "Connect wireless enabled LC20 or LC30 temperature gauge on RF Channel..."
The channel number displayed will be whatever wireless channel the FieldLab is set to. The factory default is 26, but the FieldLab can be set to any channel numbering 11 through 26.

On the Field Gauge/Process Meter, power on the radio.
1: To access the Radio controls, press and hold the Menu/Up Arrow button.

2: Select the Backlight/Right Arrow button to scroll to RADIO.

3: Select the Zero/Check button to access the Radio submenu.

4: Select the Zero/Check button a second time to turn the radio ON.
You should see a 'Waiting' message and a blinking link icon. This indicates the radio is on and looking for another device to connect to.
When the link icon in the upper right of the screen is solid, and not blinking, that means a connection has been established with another device.
You can confirm that the Field Gauge/Process Meter is connected to the FieldLab if you see the corresponding serial number with a wireless icon next to it on the FieldLab screen.
Repeat the above steps with a second Field Gauge/Process Meter if you are using separate device for a second temperature (T2) reading.
On the FieldLab, confirm that the Field Gauge/Process Meter is connected wirelessly.
You can identify every device connected to the FieldLab by its serial number. If there are other Field Gauges or Process Meters with wireless radios on and within range, they may appear on the screen as well.

Select the serial number of the device you want to use for the Temperature 1 (T1) readings.
If there is more than one Field Gauge and/or Process Meter connected to the FieldLab, you may need to use the Up/Down Arrow buttons to scroll to the serial number of the device you wish to use.
Press the Right Arrow button for SELECT to select the device you wish to use for your Temperature 1 (T1) readings.
Confirm Field Gauge/Process Meter selection.
Confirm that the serial number displayed matches the device you want to use for Temperature 1 (T1) readings and select the Right Arrow button for NEXT.
If it is not the desired device, select the left arrow button for BACK and select a different one.

If your test specifies two temperature readings, repeat Step 6 for Temperature 2 (T2).
Select the Log Button to START LOGGING.

Select the Log Button to STOP LOGGING at any time.
The FieldLab will continue logging until you select the Log Button to STOP LOGGING, or until the duration specified in the test has been met for an automatic stopping point.
Next Steps:
Some things you may want to do after you've performed a Hydrostatic Test.
- Import Data Sets from FieldLab.
- Export Data Sets from FieldLab Desktop.
You can also log pressure and temperature readings for a Hydrostatic Test directly to your computer. Learn how: